A simple guide to show you How you can Add Instagram Widget in Blogger blog,Instagram is a Fun Simple image sharing app and it has quickly become one of the best social visual media platforms and fast-growing social media site with over 400M+ Monthly users and on average 80M+ photos shared on a daily basis.
There are various ways to increase your Instagram followers and embedding Instagram widget on your website/blogger blog can be very helpful to build a strong following on the platform.
As Instagram doesn’t have their Official widget so you can use the Third party javascript widgets to show your Instagram feed in your blog. Like we have included in our Amazine Blogger Template and Blush Blogger Template
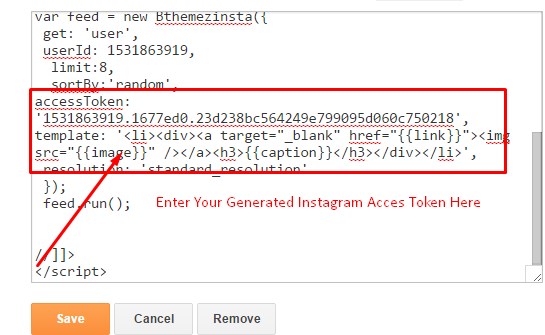
To properly use this widget first you need to generate instagram access token.
Note: Steps below will work only in our Blogger Templates.
Instagram Widget Blogger Styles
We have provided several Instagram photos styles to embed in your website/blog directly. Just copy the code below and paste it any javascript/HTML widget in blogger layout.
- On Blogger Dashboard Click Layout.
- Click Edit on Instagram Widget In footer area.
- If there’s no widget then Add a widget and Choose HTML/Javascript.
- Copy the following Code:
Instagram Widget Blogger For Footer Style
<div class='media-left'>

<div class='table-cell-m'>
		<h4 class='widget-title'>Instagram</h4>

				<a class='btn btn-default' href='//instagram.com/bthemez' rel='me'>Follow Us</a>


  </div>
</div>

<div class='instagram-footer'>
<div class='dark-wrapper'>


      <div class='cf'/>
      <ul id='instafeed' class='insta-slick'>
</ul>
</div>

<script type='text/javascript'>//<![CDATA[

   $(document).ready(function(){
var feed = new Instafeed({
 get: 'user',
 userId: 3818481741,
  limit:14,
  sortBy:'random',
  accessToken: '3818481741.1677ed0.14b2e5f55b6842a2a898da10ef99c145',
   after: function () {

     var owl = $('.insta-slick');
     owl.slick({
  dots: false,
  infinite: false,
  speed: 300,
prevArrow: '<button type="button" class="slick-nav slick-prev"><i class="fa fa-angle-left"></i></button>',
 nextArrow: '<button type="button" class="slick-nav slick-next"><i class="fa fa-angle-right"></i></button>',
  arrows:true,
  slidesToShow: 5,
  slidesToScroll: 2,
autoplay: false,
draggable:true,
infinite:true,
  autoplaySpeed: 3500,
  responsive: [
    {
      breakpoint: 1024,
      settings: {
        slidesToShow: 3,
        slidesToScroll: 3,
        infinite: true,
        dots: true
      }
    },
    {
      breakpoint: 600,
      settings: {
        slidesToShow: 2,
        slidesToScroll: 2
      }
    },
    {
      breakpoint: 480,
      settings: {
        slidesToShow: 1,
        slidesToScroll: 1
      }
    }
    // You can unslick at a given breakpoint now by adding:
    // settings: "unslick"
    // instead of a settings object
  ]
});

},


   template: '<li><a href="{{link}}" target="_blank"><div class="zoom-out-effect left"><div class="img-box"><img src="{{image}}" /></div> <div class="info-box"><div class="info-content"><div class="insta-likes"><i class="fa fa-heart"></i>{{likes}}</div> <div class="insta-com"><i class="fa fa-comment-o"></i>{{comments}}</div>   </div></div></div></a></li>',
 resolution: 'standard_resolution'
 });
 feed.run();

 });
//]]>
</script></div></div>
Instagram Widget Blogger For Sidebar Only
For Sidebar Instagram Use the Code below.
For Instagram Grid Style
For Instagram Slider Style For Sidebar
| Note | just change the # with your instagram url |
| Generate Access Token | you need access token for instagram widget to work Go to this url-> http://blog.bthemez.com/instagram-access-token-generator/ Generate access token |
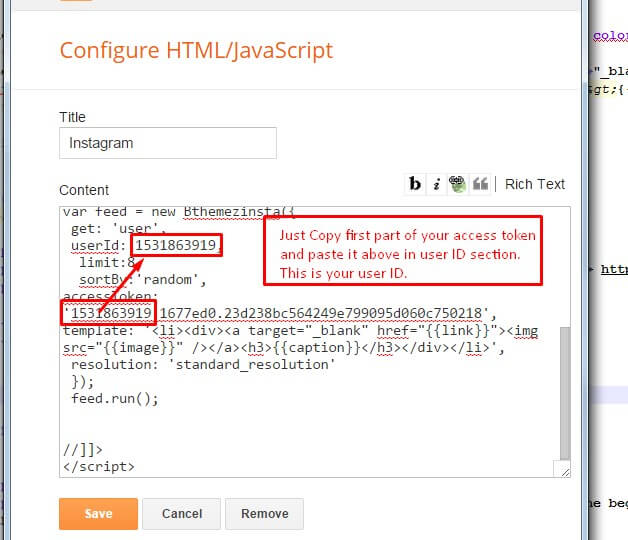
| Sign In and Follow the steps | Then You’ll be given an access token like this 1531863919.1677ed0.23d238bc564249e799095d060c7521327 |
| Follow The next step | Add Instagram User ID: |
| To Change No. Of Instagram photos in slider | slidesToShow: 5 ( CHange the value in instagram code). |
| To Change Total No. Of Instagram photos | limit:14 ( CHange the value in instagram code). |


