Remember when most of us first started our blogging journey, the first thing what we did was searched on google “HOW TO START A BLOG” and got to know about 2 popular platforms which are preferred by the majority of blogger community is google’s Blogger and WordPress. Blogger has slightly advantage over WordPress as it is a free platform and requires less technical knowledge to get started which we most newbies favors.
Custom Domain Name Vs Blogspot Subdomain
When you first Signup at blogger.com for a blog, you’ll automatically receive a free blogger subdomain, for example after signup your Blog URL would be like this emily.blogspot.com, Despite all the features like Unlimited storage, Unlimited bandwidth, Free Blog Name and many other but you have to use that Blogspot subdomain, As your blog grows the first thing you’d want to do is switch to some blog name which explains your niche/blogging passion. A custom domain would be something like this example.com or www.example.com.
How To Setup Custom Domain Name In Blogger
Please note that you need to purchase the custom domain name before start any of these steps below. Following are some of the sites which offer and provide domain name on a subscription basis the monthly or yearly choose whichever you like.
- Godaddy
- Namecheap
- EasyDNS
In this tutorial, we are using the godaddy.com, so if you’ve purchased it from different domain service provider, don’t worry steps are almost same for all. Now Let suppose you have domain name mynewdomain.com. For Namecheap, you can follow the guide about adding domain to blogger
- Login to your blogger account.
- Now you’ll be in Blogger Dashboard. Just go to blogger setting. In basic setting, you’ll see something like this. Click “+setup third party URL for your blog”.

- After that, you’ll see “Third-party domain settings” next to “http://” just type your domain that you just purchased and be sure that you have included “www” prefix to the domain name.

- Then Click on “View Setting Instructions”. It will redirect you to google’s help page which has all the instructions how to setup CNAME. Steps are too much confusing for a newbie. we’ll try to simply so read all the steps.
- On View Instruction setting page choose “On a top-level domain (www.example.com)”.

- On this very page, You’ll see 4 Ip address. Just Copy it somewhere you’ll need them later.

- Now Go back to your blogger setting again, and hit save. When you hit save it will give you an error that we haven’t verified the authority of domain don’t worry about that we will do it in next step.

- At this point, Just copy the host field and Destination field somewhere.
- Now login to your Godaddy.com account and select manage in the domain.

- When the page loads you’ll see your recently purchased domain from GoDaddy. Just choose which domain you want to use and select the manage DNS setting.

- Now It will take you to the DNS record page. In which you’ll all the DNS records which are already associated. we don’t have to change them, we have to add record there. To add a new record just click on add button below on that page.
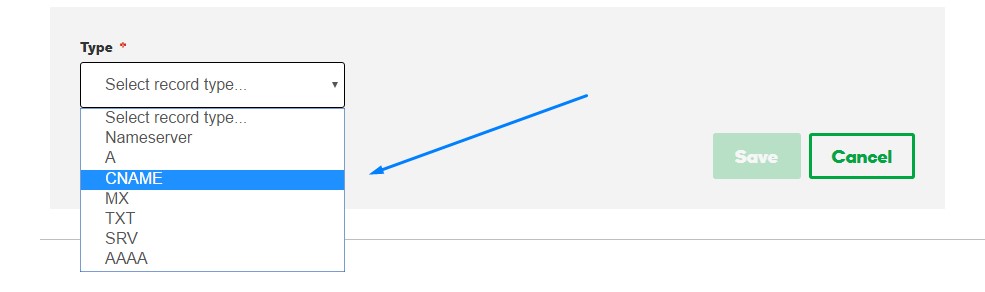
- Now we have to add CNAME There, remember we have saved the host field and destination field. refer point 7.
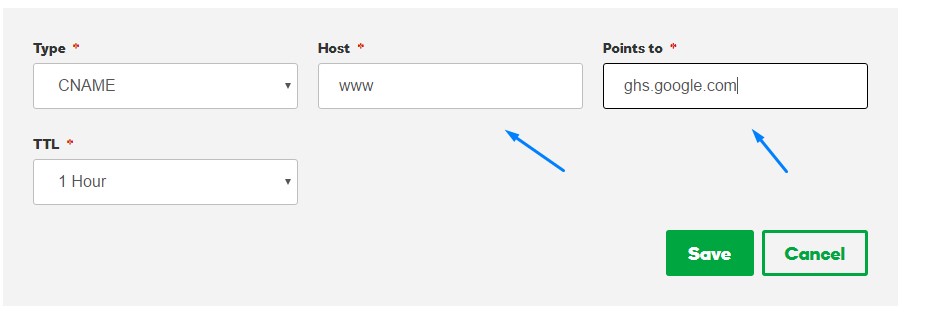
- make sure you add both of them.we just showed you one. but you have to save both of them.
- Now we need to add those 4 Ip addresses which we saved earlier. Click on add again and this time, select A record instead of CNAME record.
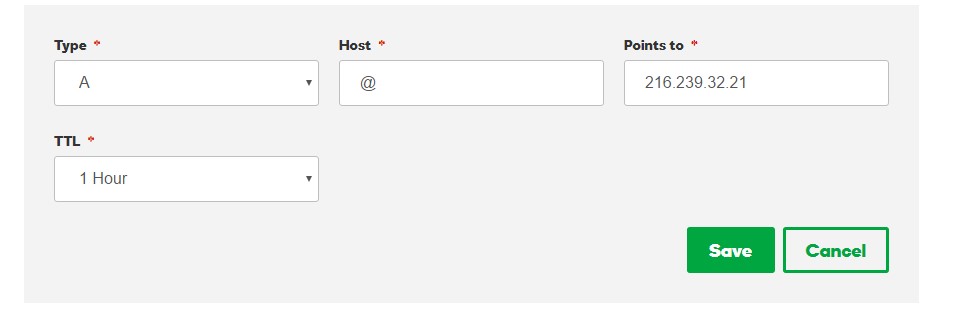
- And you need to add all 4 like this in A record. After that just delete the old A record if there’s any which has host @. Make sure you have all 4 google Ip address which has type A and Host – @ always.
- Now Go to Blogger dashboard setting and hit save again. You shouldn’t see any error now. It will take some time to take effect so sit tight for 24 hrs to 36 hrs.
- Congratulations All Done!! Happy Blogging with new custom domain name.