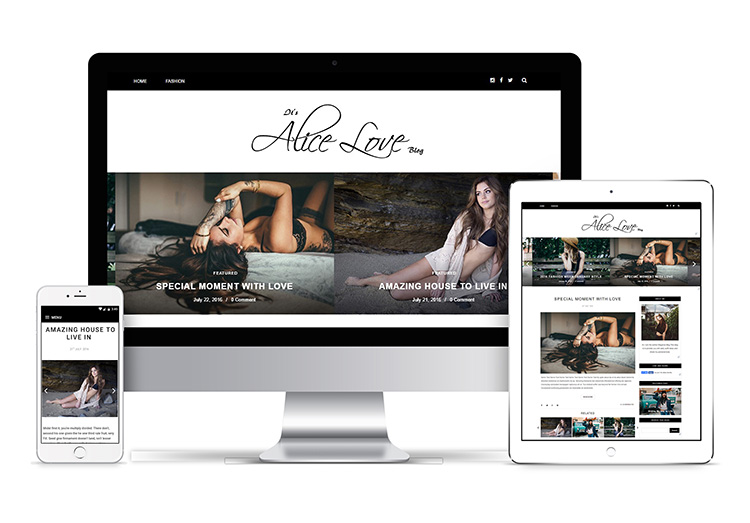
Alice Personal Blogger Template Installation Documentation to help you get beautiful classically elegant blog design and setup like our demo. a step to step guide to help you out to set up your blog easy way. featured slider, homepage styles, undefined problem, Instagram slider widget and many other social Widgets.
First of all, Thank you for Downloading our template if you haven’t done yet you can get it from here : Alice Personal Blogger Template. You can check the live demo through the button below and also Please Read this documentation carefully in order to set up your blog and please note that there’s no support for free users.
We also Provide Blogger template installation Service For those who don’t want to all the steps below and want to have this elegant design on their blog and Which you can get it from the below button.
Personal Blogger template installation Steps:-
1. Backup & Uploading
- Unzip the Template.zip file.
- On Blogger Dashboard Click Template.
- Click on Download Full Template to keep your old template.
- Click Browse… button. Find where the “preium-blush-final.xml” file location.
- Then Click Upload.
- Edit mobile Preview. (follow images)


2. Alice Personal Blogger Template Installation & Blog Setting
After installing the theme, there are minimum settings to make all widgets work fine in this template.
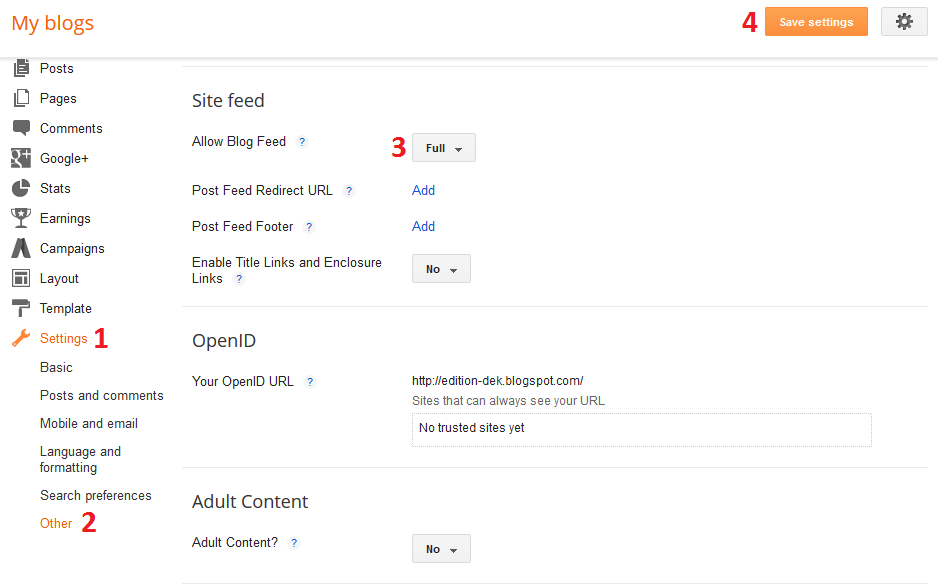
- On Blogger Dashboard Click Settings.
- Click Other.
- In Site Feed > Allow Blog Feed Choose Full.
- Then Click Save settings.
3. Setting Up Meta Tags
For SEO Purpose, Meta Tags are very important for your site. Search robots use this tags to index better and display better on the search result.
If you don’t know what these tags are and how you can use it in theme. Just follow this simple guide, we recommend you to use free online tool like Jetseotools.com to generate your Meta tags.
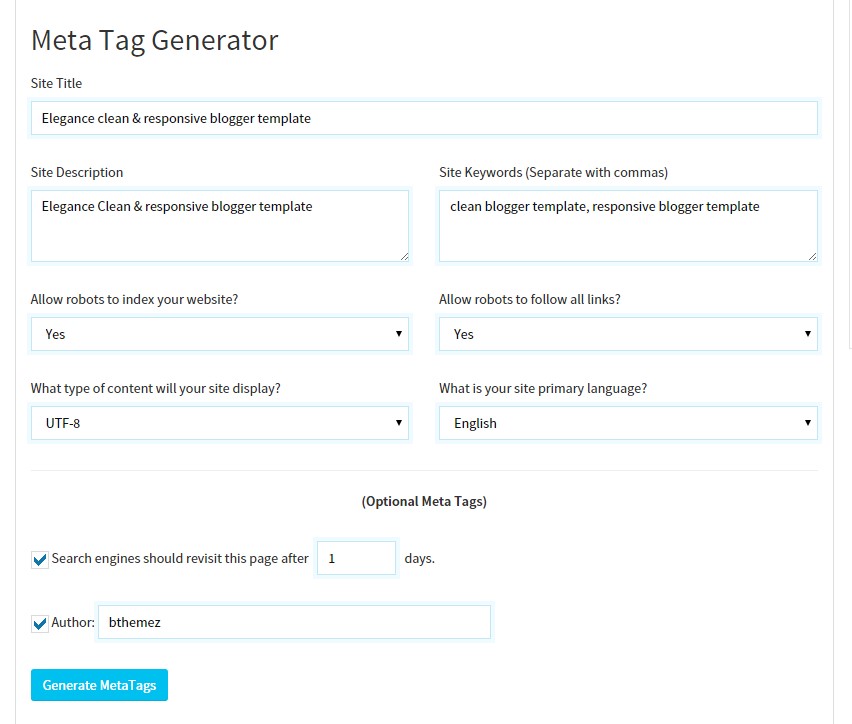
- It’s very simple, all you have to do is visit the link above and fill all the necessary details that describes your site and what keyword you want.
- Click Generate Meta tags.
- Copy all generated code & paste in your template head section. we have leave the space for that.
- Then Click Save Template.
4. How to solve Blank Post Problem
If you the template is installed successfully and you see blank posts when on homepage, then you need to add Google+ profile to your blog.
1. Just go to blogger setting
2. Then in Post setting and add your google+ profile there.
5. How to solve undefined Problem
If you’re seeing undefined undefined undefined in date area, then please follow the steps here to solve the blogger undefined problem.
6. Main Blogger Setting for personal blogger template installation
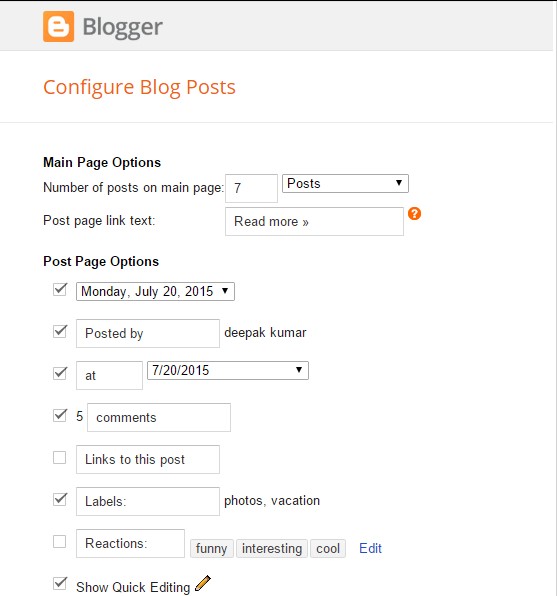
- On Blogger Dashboard Click Layout.
- Click Edit on Blog Posts Widget.
- Change it to look like that image.
- Click Save
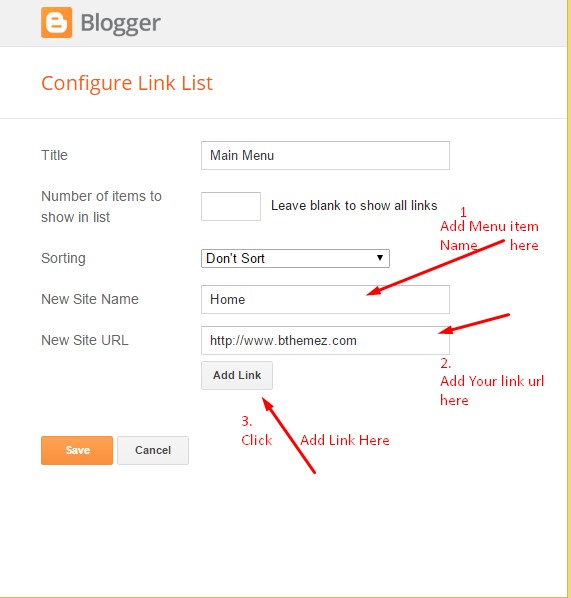
7. Main Navigation Menu
- On Blogger Dashboard Click Layout.
- Click Edit on Menu Widget.
- Change it according to your needs. Add name of the link and link url then click add Link
- Click Save.
- To Add sub menu Item. You have to add “_”(underscore without quotes) before Menu item Link
- Change the location of menu item using arrow down and arrow up Icon
- For More Information- Watch Video Below
10. How to Add featured Slider
Head over to our how to add a featured slider small guide. You’ll be easily adding amazing featured slider in your blog.
11. Follow Us Widgets
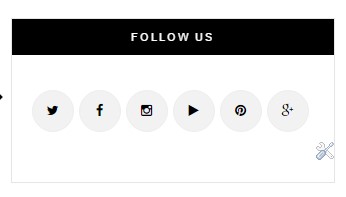
Note : Replace our Social url with our social links
12. Social Widgets
Get the Code for social widget from our Blush Blogger Template Installation. Alice Blog theme also has facebook widget, 2 Instagram styles, Twitter Widget, and Many More.
You can find the all the sidebar widget code from Step 12.
13.How to Add Footer social links
With Amazine blogger template you can easily add any type of social links in Footer area.
- On Blogger Dashboard Click Layout.
- Click Edit on top-social-foot (Social Link) Widget.
- Change it according to your needs. Add name of the link and link url then click add Link
- Click Save.
- You can find social site name here : Font Awesome Icons
- Just Search For Particular Social And Add that in Site Name Section
For Example if you have to add “facebook” icon then just add facebook in name of New site name section and below add url of that particular site.

13. Instagram Widget For Footer
To show Instagram photos on your blog you need to Generate Instagram Access Token, we have provided a guide in depth so you can understand. use the code below for Instagram footer widget.