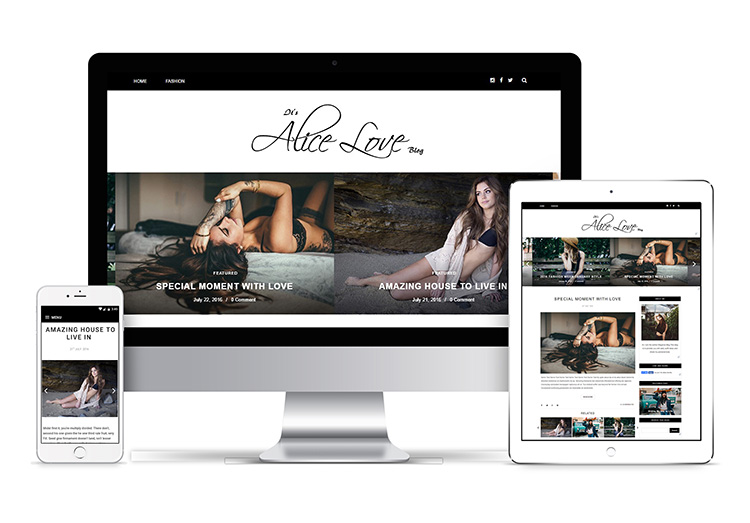
Basel Responsive Blogger Template Installation Guide is to help you understand how you can easily your blog setup beautifully like our blog demo. This is a step to step documentation so you can set up all our custom blogger widgets such as a featured slider, homepage styles, undefined problem, Instagram Widget and many other social Widgets easily.
First of all, Thank you for Downloading our Basel Premium Blogger Theme if you haven’t done yet don’t worry you can get it from here: Basel Responsive Blogger Template. You check the live demo through the button below. Please Read this documentation carefully in order to set up your blog and please note that there’s no support for free users.
We also Provide Blogger Template Installation Service, if you’re not familiar with blogger installation or newbie blogger we provide the installation service, where our technical representative will setup your blog.
Basel Responsive Blogger Template Installation Guide Steps:-
1. Backup & Uploading
- Unzip the zip file.
- On Blogger Dashboard Click Template.
- Click on Download Full Template to keep your old template.
- Click Browse… button. Find where the “preium-baselfinal.xml” file location.
- Then Click Upload.
- Edit mobile Preview. (follow images)


2. Basel Responsive Blogger Template Installation Guide & Blog Setting
After installing the theme, there are minimum settings to make all widgets work fine in this template.
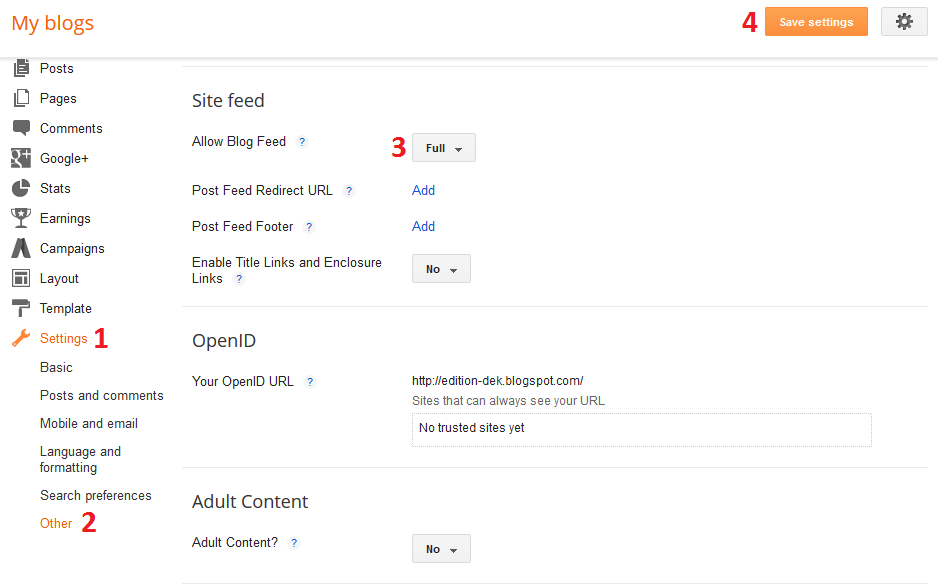
- On Blogger Dashboard Click Settings.
- Click Other.
- In Site Feed > Allow Blog Feed Choose Full.
- Then Click Save settings.
3. Setting Up Meta Tags
For SEO Purpose, Meta Tags are very important for your site. Google Search Engine robots use this tags to index better and display better on the search result.
If you don’t know what these tags are and how you can use it in theme. Just follow this simple guide, we recommend you to use free Meta Tag Generator online tool to generate your Meta tags.
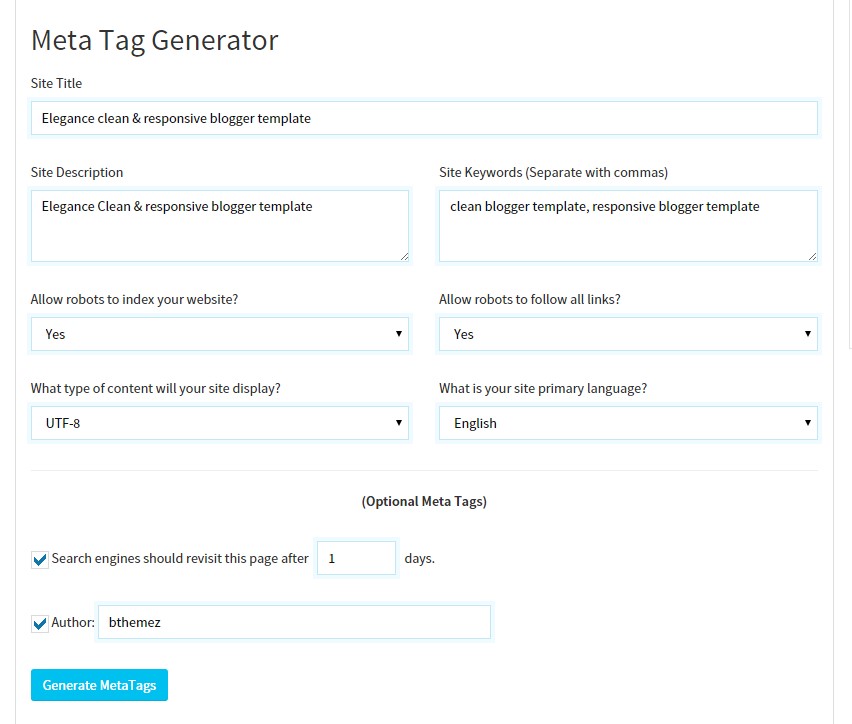
- It’s very simple, all you have to do is visit the link above and fill all the necessary details that describes your site and what keyword you want.
- Click Generate Meta tags.
- Copy all generated code & paste in your template head section. we have leave the space for that.
- Then Click Save Template.
4. How to solve Blank Post Problem
If you the template is installed successfully and you see blank posts when on homepage, then you need to add Google+ profile to your blog.
1. Just go to blogger setting
2. Then in Post setting and add your google+ profile there.
5. How to solve undefined Problem
If you’re seeing undefined undefined undefined in date area, then please follow the steps here to solve the blogger undefined problem.
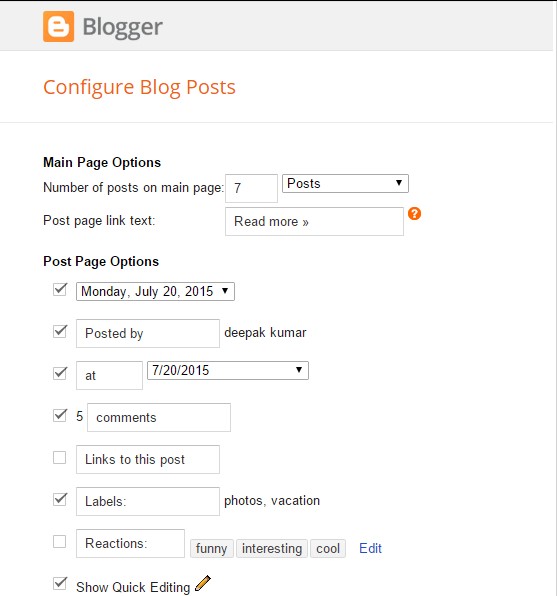
6. Main Blogger Setting
- On Blogger Dashboard Click Layout.
- Click Edit on Blog Posts Widget.
- Change it to look like that image.
- Click Save

7. Main Navigation Mega Menu
<div class="menu-container" id="sticky">
    <div class="container">
        <div class="sixteen columns">

            <!-- Navigation List -->
            <div class="table">
                <nav id="primary_nav_wrap">
                    <ul class="bt-nav navlist submenu">
                        <li><a href='/'>Home</a></li>
<li><a href='http://www.bthemez.com/2016/10/modern-grid-blogger-template-responsive.html'>Download</a></li>
  <li><a href='http://vogue-bthemez.blogspot.in/'>Pages</a>
              <ul class="submenu"><li><a href='http://vogue-bthemez.blogspot.in/p/about.html'>About us</a></li>
<li><a href='#'>Page 1</a></li>
</ul>
</li>

<li class='megamenu col-no'><a href='http://vogue-bthemez.blogspot.in/search/label/simple'>Simple Post</a><!-- Megamenu Starts-->
                <script class='java' type='text/javascript'>//<![CDATA[
                  var numpostsmenu = 4;
                  var outerclass = "sub-menu";
var starttags = "<li class='menu-small-post col-3-12'>";
                  var endtags = "</li>";
                  var intag = "div";
                  //]]>
                </script>
                <script class='java' src='/feeds/posts/default/-/simple?alt=json-in-script&callback=labelthumbs' type='text/javascript'></script>
              </li><!-- Megamenu Ends-->


<li class='megamenu col-no'><a href='#'>Fashion</a><!-- Megamenu Starts-->
                <script class='java' type='text/javascript'>//<![CDATA[
                  var numpostsmenu= 4;
                  var outerclass = "sub-menu";
var starttags = "<li class='menu-small-post col-3-12'>";
                  var endtags = "</li>";
                  var intag = "div";
                  //]]>
                </script>
                <script class='java' src='/feeds/posts/default/-/featured?alt=json-in-script&callback=labelthumbs' type='text/javascript'></script>
              </li><!-- Megamenu Ends-->

<li><a href="#">Categories</a>


            <ul class="sub-menu">
                <li><a href="http://www.twentyteenz.com/search/label/Beauty">Beauty</a></li>
                <li><a href="http://www.twentyteenz.com/search/label/fashion">Fashion</a></li>
<li><a href="http://www.twentyteenz.com/search/label/Blogger%20Tips">Blog Tips</a></li>

            </ul>


</li>


                              </ul>


            </nav>
        </div>

    </div>
</div></div>

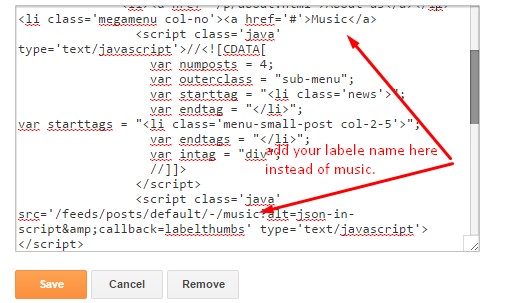
- On Blogger Dashboard Click Layout.
- Click Edit on Menu Widget.
- Add The Following Code.
- For More Information- Watch Video Below
8. Hide/Show Sidebar on Homepage
When you first install this theme, you’ll see Modern Grid Style with no sidebar. By Default sidebar is Disabled from the homepage. But you can easily Enable it with Our Theme Options Panel.
This feature is available on premium version only
- On Blogger Dashboard Click Layout.
- Click Edit on Show Sidebar (Default N )
- To Show sidebar just type “y” (without quotes)( Note: Make sure it is small y not capital.
- And To Hide it again just type “n” (without quotes)( Note: Make sure it is small n not capital.
- Click Save.
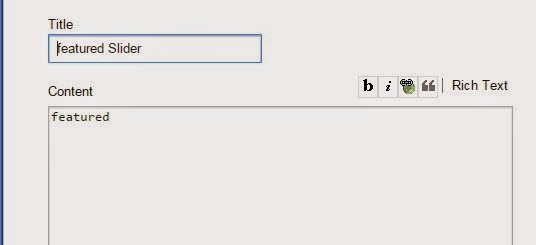
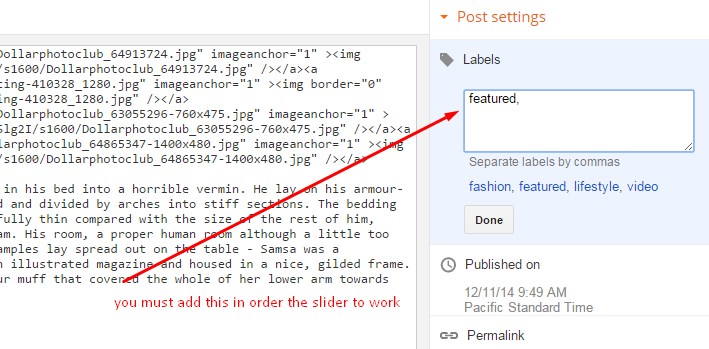
9. How to Add featured Slider
Head over to our how to add a featured slider small guide. You’ll be easily adding amazing featured slider in your blog.
10. How to Change featured Slider Styles
As you may know, this modern grid blog has two slider styles one is Simple Default Slider Design and the Other One is Premium Slider Style.(Premium Feature).
If you don’t see any theme option widgets, to change homepage styles and slider style widget. Then follow this guide to solve blogger layout problem.
Simple Default Slider
It is default layout when you install the theme for the first time this is the style that would show up on the homepage.

Premium Slider Style
This Slider Style is available in Premium Version of Modern Grid Blogger Template. Not Available in Free Version.

Basel Premium Sider Style– TO Activate This style you need to add our “style2” shortcode in Hompage Style widget from layout section.
- On Blogger Dashboard Click Layout.
- Click Edit on Slider Styles Widget.
- Just Use “style2” ( without quotes).
- Click Save.

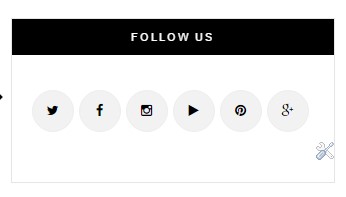
11. Social Widgets
Get the Code for social widget from our Blush Blogger Template Installation. Check after the point no. 12 Blogger Social Widgets
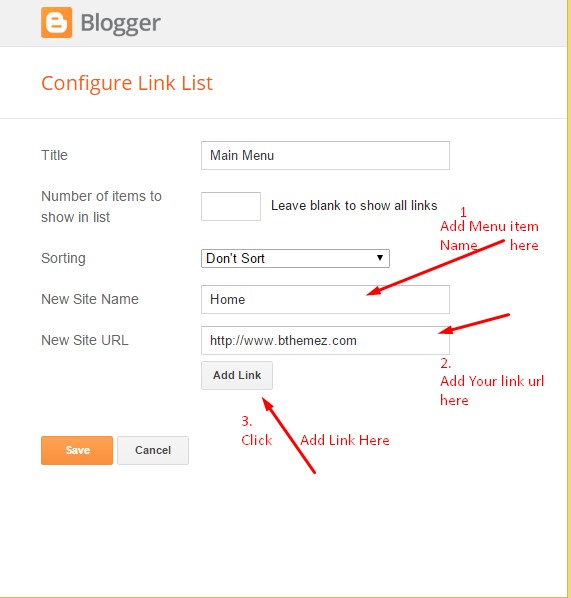
12.How to Add social links
With Our Modern Grid blogger template, you can easily add any type of social links in Footer area.
- On Blogger Dashboard Click Layout.
- Click Edit on top-social-foot & top-social-home (Social Link) Widget.
- Change it according to your needs. Add name of the link and link url then click add Link
- Click Save.
- You can find social site name here : Font Awesome Icons
- Just Search For Particular Social And Add that in Site Name Section
For Example if you have to add “facebook” icon then just add facebook in name of New site name section and below add url of that particular site.

13. Instagram Widget For Footer
To show Instagram photos on your blog you need to generate the access token for Instagram, we have provided a guide in depth so you can understand. Here’s how you can add instagram widget in blogger.
14. Mailchimp Widget for blogger

This is Widget for Mailchimp Subscription which will allow you to easily increase your subscription and send awesome email to your user for free.
If you don’t wish to use this widget then do not add the following code.
- On Blogger Dashboard Click Layout.
- Click Mailchimp widget Section and edit the widget and add the following code
Step 1: Click on Edit on mailchimp Widget
Step 2: Add the following code for Subscription form
<div class="post_author"> <!-- Begin MailChimp Signup Form --> <h3 class="heading-border">Join Our Madness- MailChimp Newsletter!</h3> Join with Thousands Of Subscribers ! Get Our Latest Articles Delivered to Your email Inbox! <div class="subs-foot"> <div id="mc_embed_signup"> <form id="mc-embedded-subscribe-form" class="validate" action="//bthemez.us8.list-manage.com/subscribe/post?u=1afddba24ae932c8dcadfeb1d&id=647baeae01" method="post" name="mc-embedded-subscribe-form" target="_blank"> <div id="mc_embed_signup_scroll"> <input id="mce-EMAIL" class="email" name="EMAIL" type="email" value="" placeholder="email address" /> <!-- real people should not fill this in and expect good things - do not remove this or risk form bot signups--> <div style="position: absolute; left: -5000px;" aria-hidden="true"><input tabindex="-1" name="b_e7fd30673f6532475252841f7_7d8c36f9d2" type="text" value="" /></div> <input id="mc-embedded-subscribe" class="button" name="subscribe" type="submit" value="Subscribe" /> </div> </form> </div> </div> <div class="clear"></div> </div>
You can setting and read more about mailchimp form here: Mailchimp Signup Form.

Step 1: Sign In mailchimp account & Create List First
Step 2: Copy All the code and paste it any notepad first and then copy the highlighted part and replace with ours.