Arkana A Free Regular vintage font script, perfectly designed to give your graphic designs an artistic brush handcrafted feel. Arkana stylish font package contains TTF, Open Type, and Web Fonts formats so you can use it any graphic image, logos, and much more.
Vintage Font Script – Arkana Demo
This free font comes in two styles Arkana Font Regular and Arkana Rough Font, both are slightly different from one another and gives your more like handcrafted feel. But if you’re looking for some handwriting font script then you should give metafors a try.
Remember when most of us first started our blogging journey, the first thing what we did was searched on google “HOW TO START A BLOG” and got to know about 2 popular platforms which are preferred by the majority of blogger community is google’s Blogger and WordPress. Blogger has slightly advantage over WordPress as it is a free platform and requires less technical knowledge to get started which we most newbies favors.
Custom Domain Name Vs Blogspot Subdomain
When you first Signup at blogger.com for a blog, you’ll automatically receive a free blogger subdomain, for example after signup your Blog URL would be like this emily.blogspot.com, Despite all the features like Unlimited storage, Unlimited bandwidth, Free Blog Name and many other but you have to use that Blogspot subdomain, As your blog grows the first thing you’d want to do is switch to some blog name which explains your niche/blogging passion. A custom domain would be something like this example.com or www.example.com.
How To Setup Custom Domain Name In Blogger
Please note that you need to purchase the custom domain name before start any of these steps below. Following are some of the sites which offer and provide domain name on a subscription basis the monthly or yearly choose whichever you like.
Godaddy
Namecheap
EasyDNS
In this tutorial, we are using the godaddy.com, so if you’ve purchased it from different domain service provider, don’t worry steps are almost same for all. Now Let suppose you have domain name mynewdomain.com. For Namecheap, you can follow the guide about adding domain to blogger
Now you’ll be in Blogger Dashboard. Just go to blogger setting. In basic setting, you’ll see something like this. Click “+setup third party URL for your blog”.
After that, you’ll see “Third-party domain settings” next to “http://” just type your domain that you just purchased and be sure that you have included “www” prefix to the domain name.
Then Click on “View Setting Instructions”. It will redirect you to google’s help page which has all the instructions how to setup CNAME. Steps are too much confusing for a newbie. we’ll try to simply so read all the steps.
On View Instruction setting page choose “On a top-level domain (www.example.com)”.
On this very page, You’ll see 4 Ip address. Just Copy it somewhere you’ll need them later.
Now Go back to your blogger setting again, and hit save. When you hit save it will give you an error that we haven’t verified the authority of domain don’t worry about that we will do it in next step.
At this point, Just copy the host field and Destination field somewhere.
Now login to your Godaddy.com account and select manage in the domain.
When the page loads you’ll see your recently purchased domain from GoDaddy. Just choose which domain you want to use and select the manage DNS setting.
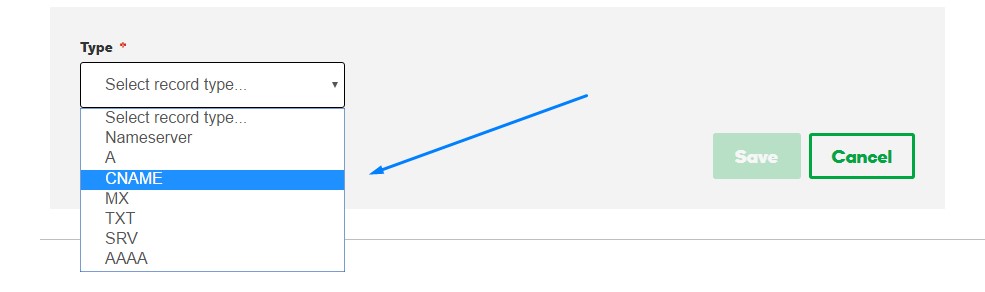
Now It will take you to the DNS record page. In which you’ll all the DNS records which are already associated. we don’t have to change them, we have to add record there. To add a new record just click on add button below on that page.
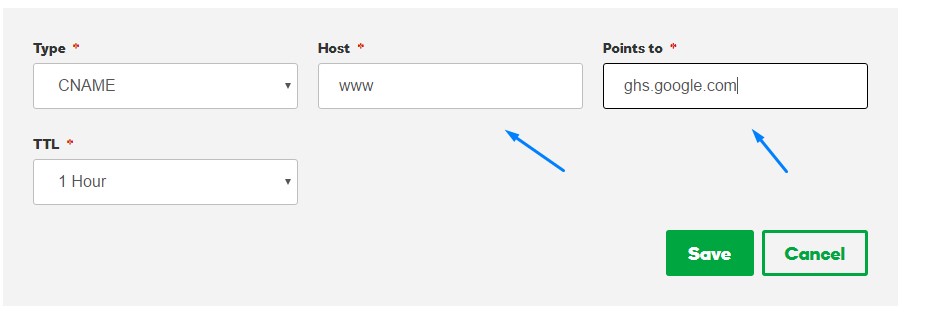
Now we have to add CNAME There, remember we have saved the host field and destination field. refer point 7.
make sure you add both of them.we just showed you one. but you have to save both of them.
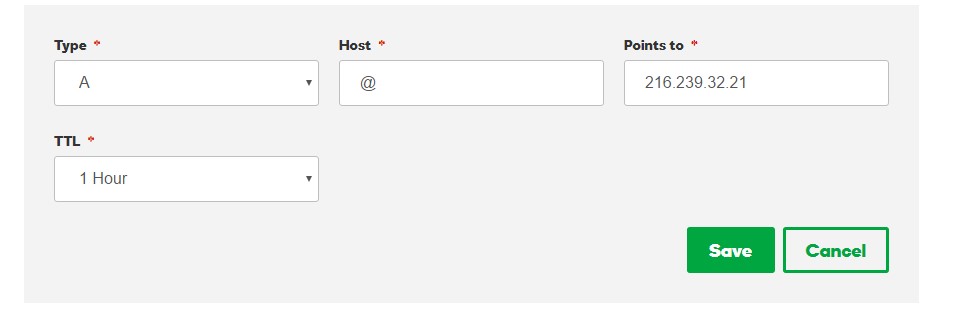
Now we need to add those 4 Ip addresses which we saved earlier. Click on add again and this time, select A record instead of CNAME record.
And you need to add all 4 like this in A record. After that just delete the old A record if there’s any which has host @. Make sure you have all 4 google Ip address which has type A and Host – @ always.
Now Go to Blogger dashboard setting and hit save again. You shouldn’t see any error now. It will take some time to take effect so sit tight for 24 hrs to 36 hrs.
Congratulations All Done!! Happy Blogging with new custom domain name.
Free Handwriting Font Script : Metafors is beautifully designed lightweight which is free for personal and commercial use. the font package contains both TTF and OTF formats so you can use easily in any of your graphics, images, projects and logos.
It is featured by specially hand writing idea, which makes it look clean and elegant at same time.
Free PSD Mockup Template to showcase your creative work in realistic & modern design. We are extremely happy to share with you, It requires adobe photoshop and uses smart object features which allows you to easily apply your own image, design or graphic. In this Free PSD Mockup Template we have included all devices( iMac, iphone, iPad, Android Phone) so you can showcase your app and web design projects in a elegant and Splendid way.
Free PSD Mockup Template Tutorial
Just Open the file in Photoshop.
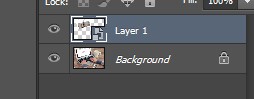
In right hand side you’ll see smart object thumbnail.
Double Click on this layer 1 and it will open new window.
Paste your Design there, which you would like to show in devices.
Save your design.
Where You Can Use These Designs
Showcase your Graphics, Apps, website.
It can be used to show your instagram profile to increase followers.
Note: Feel Free to use this mockup in any Free or Commercial products. If you want to give us credit ( Just to Motivate Designer) then we will be grateful to you if not then it’s also fine by us.
Here’s the blush blogger template installation, a step to step guide to help you out to set up your blog easy way. featured slider, homepage styles, undefined problem, Instagram Widget and many other social Widgets.
First of all Thank you for Downloading our template if you haven’t done yet you can get it from here : Blush Blogger Template. You check the live demo through the button below and also Please Read this documentation carefully in order to set up your blog, And if you don’t want to do it on your own then you can get our Installation Service From Here.
Click on Download Full Template to keep your old template.
Click Browse… button. Find where the “preium-blush-final.xml” file location.
Then Click Upload.
Edit mobile Preveiw. (follow images)
2. Blogger Setting
After installing the theme, there are minimun settings to make all widgets work fine in this template.
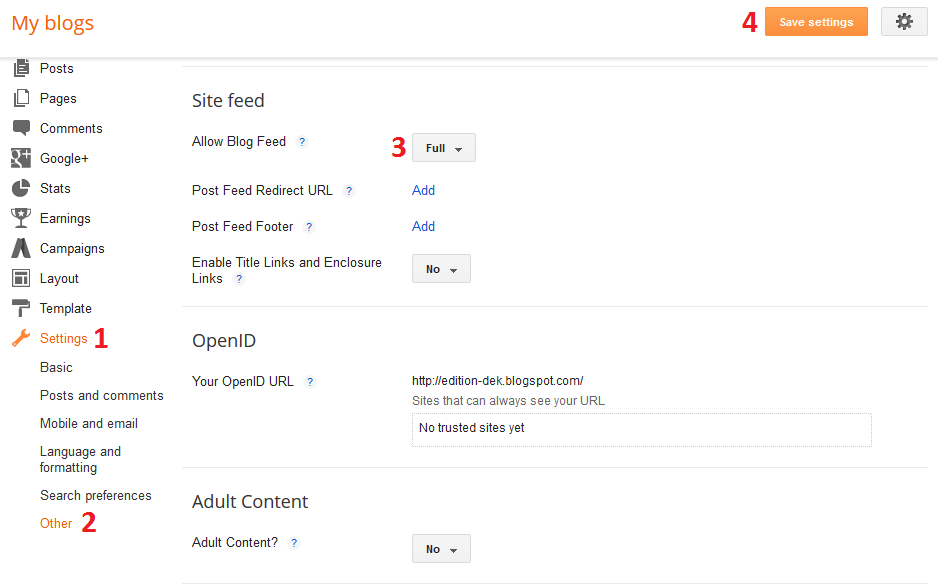
On Blogger Dashboard Click Settings.
Click Other.
In Site Feed > Allow Blog Feed Choose Full.
Then Click Save settings.
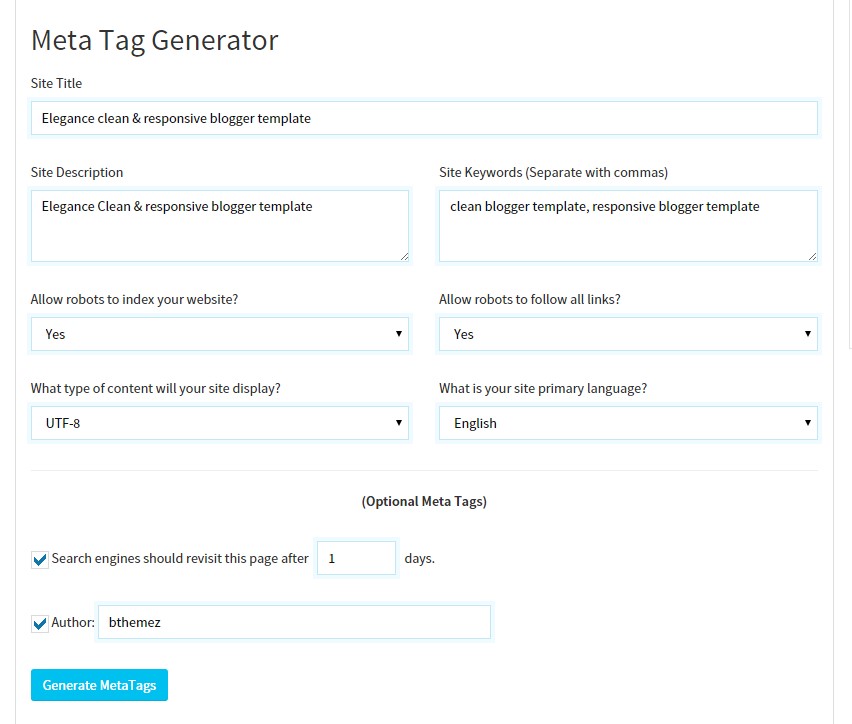
3. Setting Up Meta Tags
For SEO Purpose, Meta Tags are very important for your site. Search robots use this tags to index better and display better on the search result.
If you don’t know what these tags are and how you can use it in theme. Just follow this simple guide, we recommend you to use free online tool like Jetseotools.com to generate your Meta tags.
It’s very simple, all you have to do is visit the link above and fill all the necessary details that describes your site and what keyword you want.
Click Generate Meta tags.
Copy all generated code & paste in your template head section. we have leave the space for that.
Then Click Save Template.
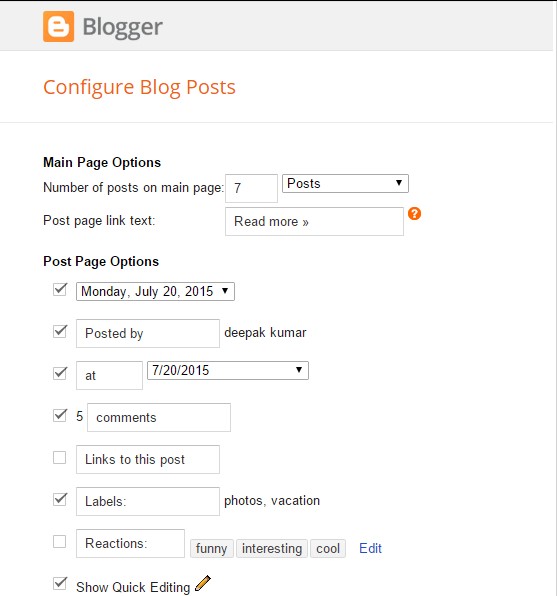
4. How to solve Blank Post Problem
If you the template is installed successfully and you see blank posts when on homepage, then you need to add Google+ profile to your blog.
1. Just go to blogger setting
2. Then in Post setting and add your google+ profile there.
4. How to solve undefined Problem
If you’re seeing undefined undefined undefined in date area, then please follow the steps here to solve the blogger undefined problem.
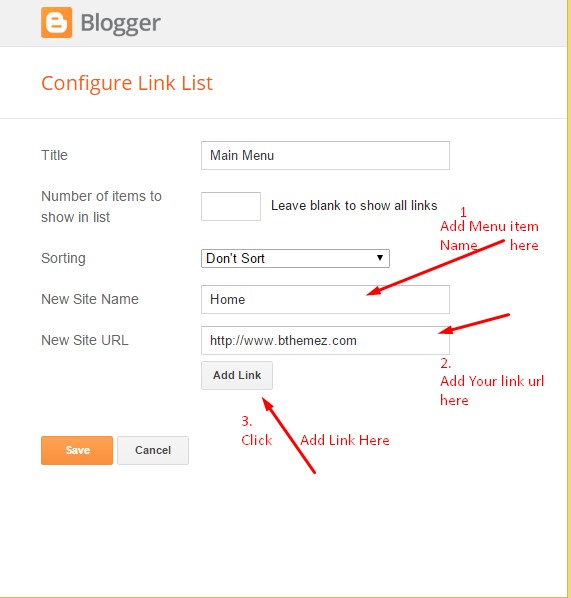
5. Social Setting
This is optional setting but we would recommend it to enable these features in your blog, to make it more social friendly.
Just Search For Particular Social And Add that in Site Name Section
For Example if you have to add “facebook” icon then just add facebook in name of New site name section and below add url of that particular site.
8. Change HomePage Styles
As you might know by now that blush is multi-layout blogger template and has many homepage styles instead of single and boring one. We have included 4 styles :-
Classic Layout( Default Style)
First Full Then All Grid
Alternate Full Layout
Simple All Grid Layout
You don’t have to change any html or css code to that. we have done it for you. All you have to do is just use shortcodes mention below to use in Home style widget.
If you don’t see any theme option widgets, to change homepage styles and slider style widget. Then follow this guide to solve blogger layout problem
1. Classic Layout– It is default layout when you install the theme for the first time this is the style that would show up on the homepage.
On Blogger Dashboard Click Layout.
Click Edit on Home Style Widget.
Just Use “classic” ( without quotes).
Click Save.
2. First Full Then All Grid– This is 2nd homepage layout. which will show the first post in full width and others in grid mode automatically. so if you like these type of style then choose this.
Check The Home style in Demo Here
On Blogger Dashboard Click Layout.
Click Edit on Home Style Widget.
Just Use “first-full” ( without quotes).
Click Save.
3. Alternate Full Layout– 3rd homepage style layout. It will show the first & 3rd post in full width and others in grid mode automatically. so if you like these type of style then choose this.
Check The Home style in Demo Here
On Blogger Dashboard Click Layout.
Click Edit on Home Style Widget.
Just Use “first-full-grid” ( without quotes).
Click Save.
4. Simple Grid – 4th homepage style layout. It will show simple grid mode automatically. so if you like these type of style then choose this.
Check The Home style in Demo Here
On Blogger Dashboard Click Layout.
Click Edit on Home Style Widget.
Just Use “simple-grid” ( without quotes).
Click Save.
9. How to Change Featured Slider Styles
We’re pleased to introduce two new featured slider style for you to choose according to your need. both styles are complementing the blog design beautifully make your blog stand out from the crowd.
Modern Full Width Slider ( Default style)
Check The Featured Slider style in Demo Here
On Blogger Dashboard Click Layout.
Click Edit on Slider Style Setting.
Just Use “slider2” ( without quotes).
Click Save
2. Stylish Classic Featured Slider
Check The Featured Slider style in Demo Here
On Blogger Dashboard Click Layout.
Click Edit on Slider Style Setting.
Just Use “slider1” ( without quotes).
Click Save
10. Hide/Show Top Header Background Image
We have included a top background image to make blog design stunning but if you want you can easily hide it. By default, it is showing.
Check The Featured Slider style in Demo Here
On Blogger Dashboard Click Layout.
Click Edit on Hide Top Background Image.
Just Use “y” ( without quotes) to hide it.
If you want show it just Use “n” ( without quotes). (It is case sensative so make sure you use n not N( capital).
Click Save
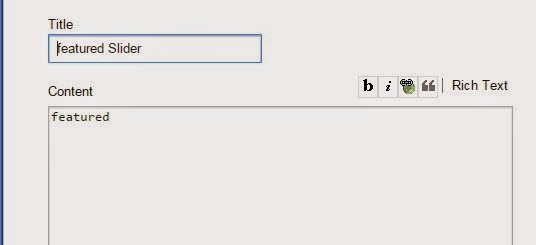
11. How to Add featured Slider.
On Blogger Dashboard Click Layout.
Click Edit on Bt-Slider Widget.
Just Use “featured” ( without quotes).
Click Save
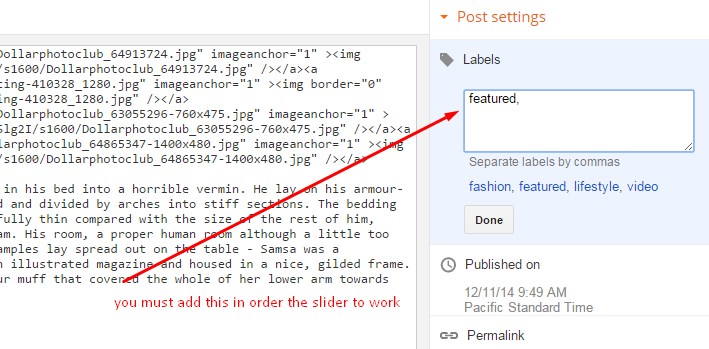
All you have to do is just add the “featured” (Without quotes ) in featured slider widget and you must have label of named featured for the post you want to show in slider and make sure your blog is set to Public.Please follow the screenshots below:
Step 1: Click on Edit
Step 2: Add The word Featured in Widget
Step 3: Add The label in your post named “featured”
Add the Following Code & the text and links according to your need.
Click Save.
Delete the whole
item of social links if you don’t want them.
Hi, I am the author Elegance Blog.This blog is to provide you with daily outfit ideas and share my personal style.
14. Instagram Widget For Footer
To show Instagram photos on your blog you need to generate an access token for Instagram, we have provided a guide in depth so you can understand & simply add a instagram widget in blogger.
15. Twitter Widget
On Blogger Dashboard Click Layout.
Click Edit on Any Sidebar HTML/Javscript Widget.
If there’s no widget then Add a widget and Choose HTML/Javascript.
Copy the following Code:
For twitter, you need to create a widget by yourself. from here Twitter Widget and when everything is fine. then hit create a widget. it will give you code just add that code in your HTML/Javascript Widget.
16. Change Footer logo
On Blogger Dashboard Click Template.
Click Jump to widget and select LinkList853.
Change the image url just below it.
Note: Blush Template Fixes
Recently Blogger Has updated their code, which causes some of the elements are not showing properly Like the image below
Lately, If you are experiencing the Menu & Social Disappear, Then please head over to our guide here to solve blogger Menu Disappearing Issue. We’ve updated our code as well If you want to can install the latest version of the theme as well.