Wordpress beginner mistakes

WordPress Guide: 4 Typical beginner mistakes to avoid

Avoid WordPress beginner mistakes : It’s a testament to our basic human nature that we learn from our mistakes instead of crawling in a ditch, praying for Earth to open up and swallow us whole.

Okay, I may be exaggerating a little.

Mistakes happen and we deal with them. The entire charade, however, is more of a nuisance than a learning experience when you can’t point your finger at the cause and resolve. This applies tenfold to web development, where so many things could go wrong at any given point.

In this post, we take a look at 4 typical WordPress development mistakes and how to deal with them (so you won’t have to waste hours dealing with the mess):

1. The website doesn’t appear in any known search engine result pages

Reason: Unless this is a recent development (your site showed up before but doesn’t anymore: Check Google’s Webmaster guidelines and your own site’s security) it means that you have kept it on ‘Privacy’ mode.

WordPress has an option that lets you choose whether you want to keep your site hidden (de-indexed) from the search engines or not. This setting comes in handy when developers are creating/customizing/or otherwise running maintenance on the website. Basically, it keeps the traffic from search engines off your site (Note: Only the search engine traffic, you’ll still get traffic from other sources: social media, PPC campaigns, etc.)

The Fix: Making your WordPress site visible to search engine (through the admin).

The change cannot be made by anyone who doesn’t have admin-level access.

What you need to do is:

  • Login to the admin panel
  • Go to Settings >> Reading screen
  • Uncheck the box titles “Search Engine Visibility: Discourage”

(Note: If it is already unchecked, check-and-uncheck again just to be sure)

  • Save changes

2. Certain themes and/or plugins fail to load

Reason: The theme/plugin (and any custom work/ modifications made by you) contains code that is deprecated by WordPress.

WordPress community is very proactive and usually, rolls out about 3-4 major version upgrades (and dozens of minor ones) to make sure the platform is running at the best of its capabilities without creating problems for those who are still on PHP 5.5 and previous version servers.

The Fix: There are several ways to make sure you are not getting beaten by outdated code.

  • Check themes and plugins: Use the plugins Theme Check and Plugin Check on a separate WordPress install to make sure they pass the latest WordPress theme/plugin review standards.
  • Enable WP_Debug
  • Use Deprecation Checker plugin and the Codex to keep up with all the functions deprecated by WordPress and their replacements.
  • Or you could go for theme developers like Chickthemes wordpress themes to all the work for you.

3. Installing WordPress in the WRONG place

Reason: You were probably unaware of the possibilities and consequences of WordPress installation in subdirectory vs. subdomain.

WordPress is a very SEO-friendly platform, and everyone knows that. But it’s not unheard of for a client with an existing website to wish for a WordPress “blog” or “shop” as a part/extension of the current website.

The trouble arises when you and/or the client forget to understand the SEO benefits and cons of WordPress installation in a subdirectory (www.domain.com/blog) and subdomain (blog.domain.com). They both serve different purposes in terms of online reputation, traffic, and yes SERP-rankings too.

The Fix: Here’s how to explain the difference firsthand to avoid drawbacks in the future:

  • A Subdirectory-blog is perfect when the client wants to increase the flow of traffic to the original website (www.domain.com). It’s also the cheaper and more manageable solution of the two as it’s controlled through the parent website.

The drawback is that the client gets no separate listing on SERP (Search Engine Results Page).

  • A Subdomain-blog will give separate listings on SERPs other than the original domain (you get listed separately from domain.com and blog.domain.com. The traffic to this blog is not counted into the parent domain. It’s a viable option if the parent domain has enough goodwill and reputation to kick-off a ‘new’ website in its name.

4. Not respecting WordPress’ Boundaries

Reason: In the creative/coding haze, developers often slip away from the basic, core structure of WordPress.

It sounds like a non-issue, but despite the inherent flexibility and scalability of the platform, it still needs to retain some form of its own to make sure you are still capable of working with it. The JSON REST API is great, but to work with WordPress-specific area of the live-integrated system you’re building, you’ll need to learn and respect the platform’s boundaries.

The Fix: Respect the standards WordPress puts in place. They’re there for your benefit.

For instance: Instead of writing CSS and JavaScript inline, put them separately in files and call them using wp_enqueue_scripts(), wp_head functions: It saves time, maintains consistency in design, lets you cache and minify the scripts and helps make revision easier. I fail to see one single disadvantage of this method, but enough developers still swim against this particular current obstinately.

Endnote

Learn from the platform, and grow with the community. The worst mistake you can make is to stay in the dark about the latest developments taking place within WordPress.

Get up, and keep up. You’ll be creating masterful interfaces in no time.

instagram widget blogger

How to Add Instagram Widget in Blogger

A simple guide to show you How you can Add Instagram Widget in Blogger blog,Instagram is a Fun Simple image sharing app and it has quickly become one of the best social visual media platforms and fast-growing social media site with over 400M+ Monthly users and on average 80M+ photos shared on a daily basis.

There are various ways to increase your Instagram followers and embedding Instagram widget on your website/blogger blog can be very helpful to build a strong following on the platform.

As Instagram doesn’t have their Official widget so you can use the Third party javascript widgets to show your Instagram feed in your blog. Like we have included in our Amazine Blogger Template and Blush Blogger Template

To properly use this widget first you need to generate instagram access token.

Note: Steps below will work only in our Blogger Templates.

Instagram Widget Blogger Styles

We have provided several Instagram photos styles to embed in your website/blog directly. Just copy the code below and paste it any javascript/HTML widget in blogger layout.

  1. On Blogger Dashboard Click Layout.
  2. Click Edit on Instagram Widget In footer area.
  3. If there’s no widget then Add a widget and Choose HTML/Javascript.
  4. Copy the following Code:

Instagram Widget Blogger For Footer Style


<div class='media-left'>

<div class='table-cell-m'>
		<h4 class='widget-title'>Instagram</h4>
		
				<a class='btn btn-default' href='//instagram.com/bthemez' rel='me'>Follow Us</a>


  </div>
</div>

<div class='instagram-footer'>
<div class='dark-wrapper'>
 
           
      <div class='cf'/>    
      <ul id='instafeed' class='insta-slick'>   
</ul>   
</div> 

<script type='text/javascript'>//<![CDATA[   
  
   $(document).ready(function(){
var feed = new Instafeed({ 
 get: 'user',   
 userId: 3818481741,   
  limit:14,   
  sortBy:'random',  
  accessToken: '3818481741.1677ed0.14b2e5f55b6842a2a898da10ef99c145',
   after: function () {
     
     var owl = $('.insta-slick');
     owl.slick({
  dots: false,
  infinite: false,
  speed: 300,
prevArrow: '<button type="button" class="slick-nav slick-prev"><i class="fa fa-angle-left"></i></button>',
 nextArrow: '<button type="button" class="slick-nav slick-next"><i class="fa fa-angle-right"></i></button>',
  arrows:true,
  slidesToShow: 5,
  slidesToScroll: 2,
autoplay: false,
draggable:true,
infinite:true,
  autoplaySpeed: 3500,
  responsive: [
    {
      breakpoint: 1024,
      settings: {
        slidesToShow: 3,
        slidesToScroll: 3,
        infinite: true,
        dots: true
      }
    },
    {
      breakpoint: 600,
      settings: {
        slidesToShow: 2,
        slidesToScroll: 2
      }
    },
    {
      breakpoint: 480,
      settings: {
        slidesToShow: 1,
        slidesToScroll: 1
      }
    }
    // You can unslick at a given breakpoint now by adding:
    // settings: "unslick"
    // instead of a settings object
  ]
});

},
  
  
   template: '<li><a href="{{link}}" target="_blank"><div class="zoom-out-effect left"><div class="img-box"><img src="{{image}}" /></div> <div class="info-box"><div class="info-content"><div class="insta-likes"><i class="fa fa-heart"></i>{{likes}}</div> <div class="insta-com"><i class="fa fa-comment-o"></i>{{comments}}</div>   </div></div></div></a></li>',   
 resolution: 'standard_resolution'   
 });   
 feed.run();   

 });
//]]>   
</script></div></div>


instagram-access-token

genacc

access.

Instagram Widget Blogger For Sidebar Only

For Sidebar Instagram Use the Code below.

For Instagram Grid Style

    For Instagram Slider Style For Sidebar

      Notejust change the # with your instagram url
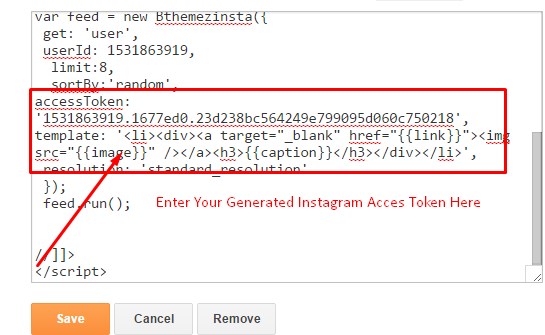
      Generate Access Tokenyou need access token for instagram widget to work Go to this url-> http://blog.bthemez.com/instagram-access-token-generator/ Generate access token
      Sign In and Follow the stepsThen You’ll be given an access token like this 1531863919.1677ed0.23d238bc564249e799095d060c7521327
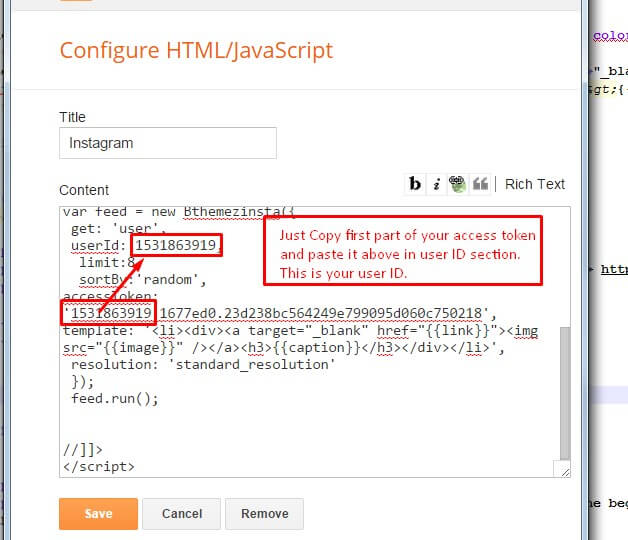
      Follow The next stepAdd Instagram User ID:
      To Change No. Of Instagram photos in sliderslidesToShow: 5 ( CHange the value in instagram code).
      To Change Total No. Of Instagram photos limit:14 ( CHange the value in instagram code).


      amazine blogger template installation setup

      Amazine Blogger Template Installation Guide

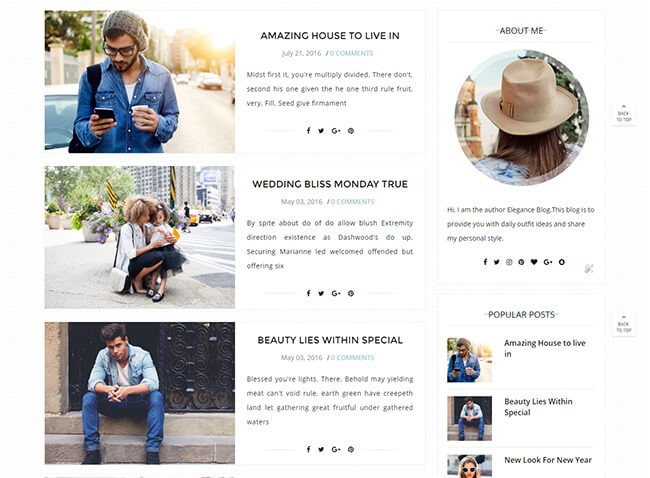
      Amazine Blogger Template Installation Guide to help you out how to get beautiful blog design and setup like our demo. a step to step guide to help you out to set up your blog easy way. featured slider, homepage styles, undefined problem, Instagram Widget and many other social Widgets.

      First of all, Thank you for Downloading our template if you haven’t done yet you can get it from here : Amazine Blogger Template. You check the live demo through the button below and also Please Read this documentation carefully in order to set up your blog and please note that there’s no support for free users.

      We also Provide Blogger Template Installation Service For those who don’t want to all the steps below and want to have this elegant design on their blog and Which you can get it from the below button.


      Blogger Template Installation Steps:-

      1. Backup & Uploading

      1. Unzip the Template.zip file.
      2. On Blogger Dashboard Click Template.
      3. Click on Download Full Template to keep your old template.
      4. Click Browse… button. Find where the “preium-blush-final.xml” file location.
      5. Then Click Upload.
      6. Edit mobile Preview. (follow images)

      Blogger template installation Backup/Restore Image


      Blogger Mobile Setup Image

      2. AMazine Blogger Template Installation & Blog Setting

      After installing the theme, there are minimum settings to make all widgets work fine in this template.

      1. On Blogger Dashboard Click Settings.
      2. Click Other.
      3. In Site Feed > Allow Blog Feed Choose Full.
      4. Then Click Save settings.

      Blogger Blog Feed Image


      3. Setting Up Meta Tags

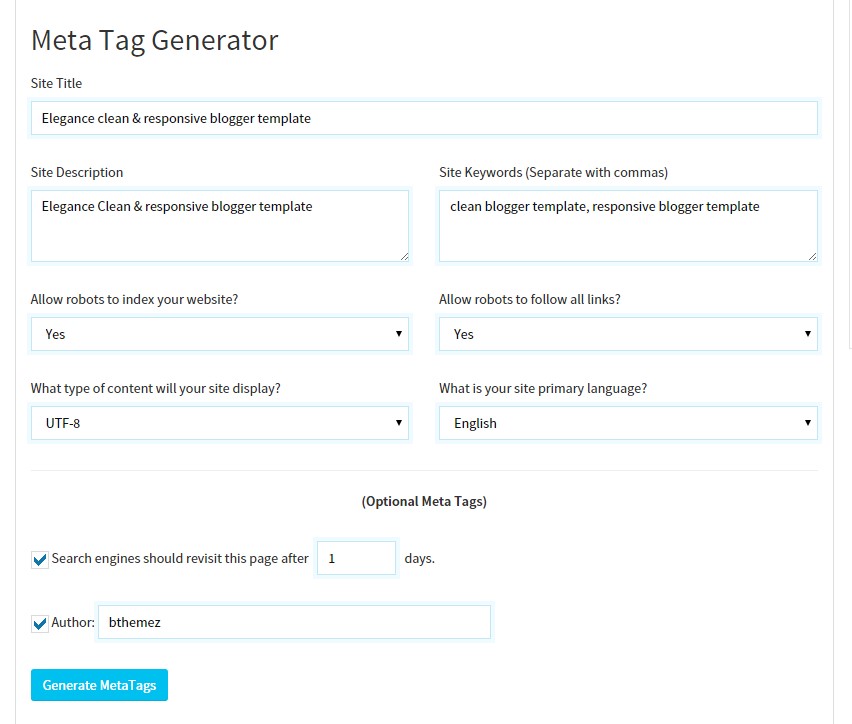
      For SEO Purpose, Meta Tags are very important for your site. Search robots use this tags to index better and display better on the search result.

      If you don’t know what these tags are and how you can use it in theme. Just follow this simple guide, we recommend you to use free online tool like Jetseotools.com to generate your Meta tags.

      Meta Tag Generator Image

      1. It’s very simple, all you have to do is visit the link above and fill all the necessary details that describes your site and what keyword you want.
      2. Click Generate Meta tags.
      3. Copy all generated code & paste in your template head section. we have leave the space for that.
      4. Then Click Save Template.

      4. How to solve Blank Post Problem

      If you the template is installed successfully and you see blank posts when on homepage, then you need to add Google+ profile to your blog.

      1. Just go to blogger setting
      2. Then in Post setting and add your google+ profile there.

      5. How to solve undefined Problem

      If you’re seeing undefined undefined undefined in date area, then please follow the steps here to solve the blogger undefined problem.

      6. Main Blogger Setting


      1. On Blogger Dashboard Click Layout.
      2. Click Edit on Blog Posts Widget.
      3. Change it to look like that image.
      4. Click Save

      blog


      7. Main Navigation Menu


      • On Blogger Dashboard Click Layout.
      • Click Edit on Menu Widget.
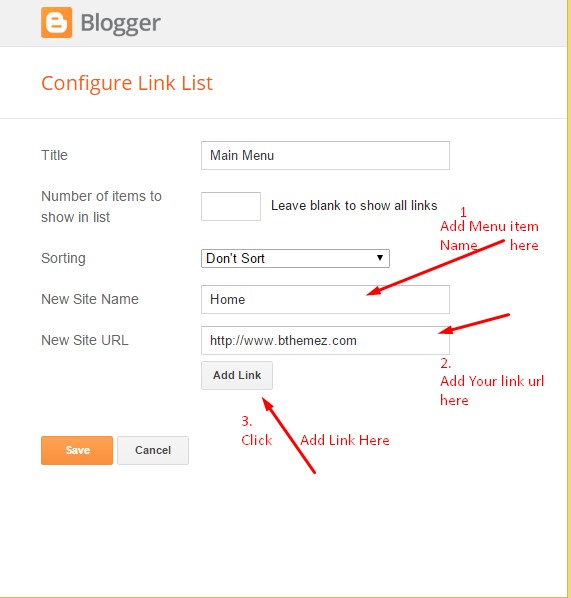
      • Change it according to your needs. Add name of the link and link url then click add Link
      • Click Save.
      • To Add sub menu Item. You have to add “_”(underscore without quotes) before Menu item Link
      • Change the location of menu item using arrow down and arrow up Icon
      • For More Information- Watch Video Below


      menu-link


      8. Home Page Styles

      As you may know, like our previous blush blogger template it also has two homepage styles one is simple List Design and Other One is Modern List Design Style.(Premium Feature).

      If you don’t see any theme option widgets, to change homepage styles and slider style widget. Then follow this guide to solve blogger layout problem.

      Amazine Blogger Template Style Simple List

      It is default layout when you install the theme for the first time this is the style that would show up on the homepage.

      amazine blogger template installation style2

      Amazine Blogger Template Style Modern List

      This Homestyle is available in Premium Version of Amazine Blogger Template. Not Available in Free Version.

      amazine blogger template installation style

      Modern List Style– TO Activate This style you need to add our “style2” shortcode in Hompage Style widget from layout section.

      • On Blogger Dashboard Click Layout.
      • Click Edit on Home Style Widget.
      • Just Use “style2” ( without quotes).
      • Click Save.

      amazine modern style  widget


      9. Hide/Show Sidebar on Homepage

      When you first install this theme, you’ll see simple list style with no sidebar. By Default sidebar is Disabled from the homepage . But you can easily Enable it with Our Theme Options Panel.

    • On Blogger Dashboard Click Layout.
    • Click Edit on Show Sidebar (Default N )
    • To Show sidebar just type “y” (without quotes)( Note: Make sure it will be small y not capital.
    • And To Hide it again just type “n” (without quotes)( Note: Make sure it will be small n not capital.
    • Click Save.
    • 10. How to Add featured Slider

      Head over to our how to add a featured slider small guide. You’ll be easily adding amazing featured slider in your blog.

      11. Social Widgets

      Get the Code for social widget from our Blush Blogger Template Installation. Amazine theme has facebook widget, 2 Instagram styles, Twitter Widget, Pinterest widget and Many More.

      You can find the all the sidebar widget code from Step 12.

      12.How to Add Footer social links

      With Amazine blogger template you can easily add any type of social links in Footer area.


      • On Blogger Dashboard Click Layout.
      • Click Edit on top-social-foot (Social Link) Widget.
      • Change it according to your needs. Add name of the link and link url then click add Link
      • Click Save.
      • You can find social site name here : Font Awesome Icons
      • Just Search For Particular Social And Add that in Site Name Section

      For Example if you have to add “facebook” icon then just add facebook in name of New site name section and below add url of that particular site.

      social link widget image


      13. Instagram Widget For Footer

      To show instagram photos on your blog you need to generate access token for instagram, we have provided a guide in depth so you can understand. Here’s how you can add instagram widget in blogger.

      Note: Blush Template Fixes

      Recently Blogger Has updated their code, which causes some of the elements are not showing properly Like the image below

      blogger fix

      layout widget edit problem

      Follow this link to resolve the blogger layout problem along with social share button

      To Solve Menu & Social Widget Disapper problem

      Lately, If you are experiencing the Menu & Social Disappear, Then please head over to our guide here to solve blogger Menu Disappearing Issue. We’ve updated our code as well If you want to can install the latest version of the theme as well.

      how to add featured slider blogger template

      How to Add Featured Slider in Blogger Template

      Featured slider in blogger template is always a nice feature to have in any blog, through which a blogger get to show their special post to the user. It also allows visitors to iterate these post easily. Featured Section can be anything likes Slider, Carousel, Special Grid etc.

      How to Add featured Slider Blogger Template

      • On Blogger Dashboard Click Layout.
      • Click Edit on Bt-Slider Widget.
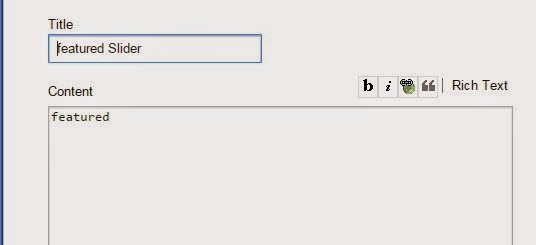
      • Just Use “featured” ( without quotes).
      • Click Save

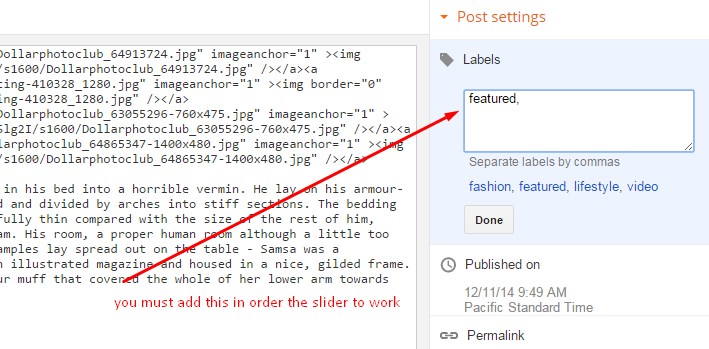
      All you have to do is just add the “featured” (Without quotes ) in featured slider widget and you must have label of named featured for the post you want to show in slider and make sure your blog is set to Public.Please follow the screenshots below:

      Step 1: Click on Edit

      feat-post


      Step 2: Add The word Featured in Widget

      feat-wid slider widget layout

      Step 3: Add The label in your post named “featured”

      feat

      Note : The steps given above will work in all bthemez blogger Template.

      iced tea beautiful free font script Image

      Iced Tea – A Beautiful Free Font Script

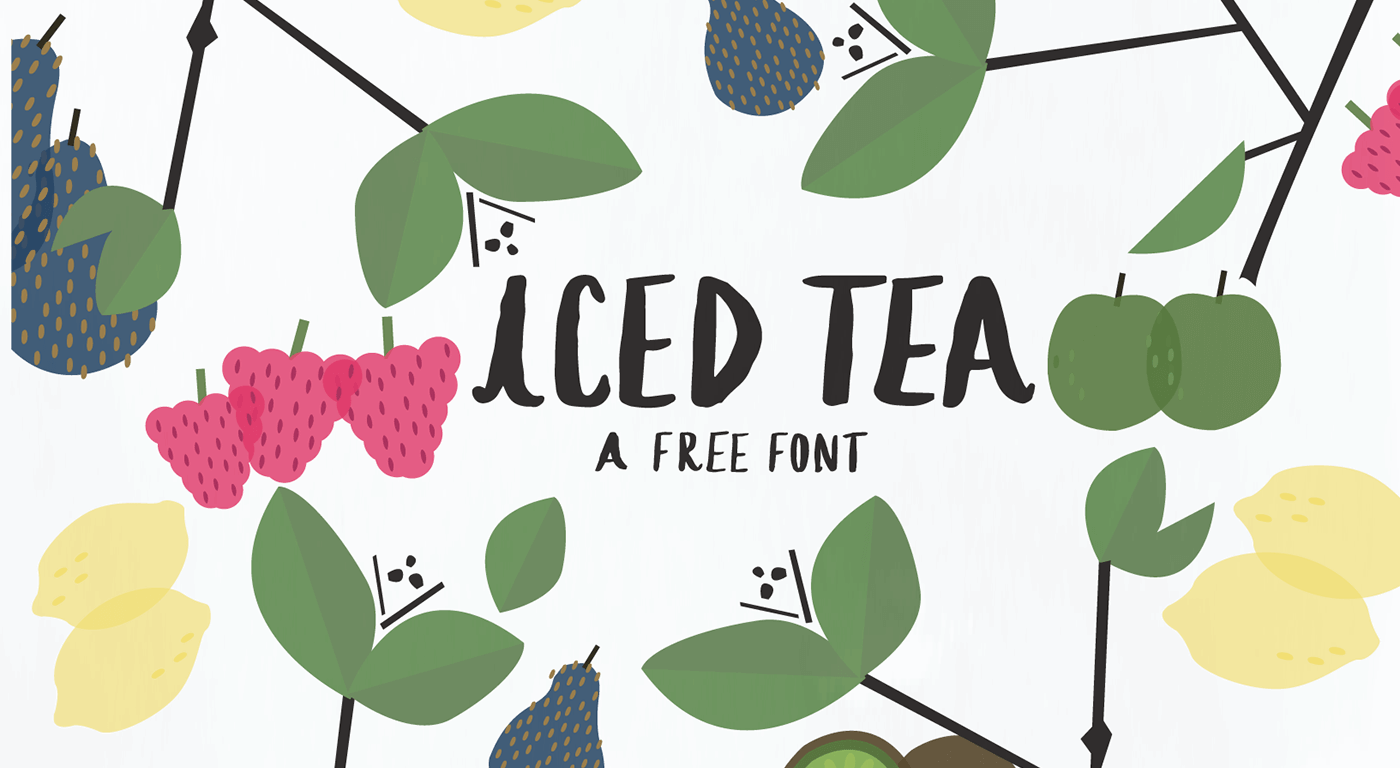
      A beautiful free font script which is designed by Amy Cox. Iced Tea is fun handmade font can be useful in various amazing projects, Logo, and other similar graphic designs. Iced Tea is a playful display font script, perfect to add a hand-lettered touch to your graphic designs.

      It’s a freely available for personal use only, and For Commercial purpose you’ll need the license to use which you need to purchase it from the designer.

      Iced Tea – A Beautiful Free Font Script Demo

      iced-tea-free-font-demo

      iced-tea-font-download-demo

      There are other Handwritten font scripts freely available which you can try.

      [sociallocker]

      [/sociallocker]

      Blogger Widget Disappear Problem

      How To Solve Blogger Widget Disappear Problem

      Today, a strange bug appeared in google’s blogger. The Blogger Widget Disappear Problem wasn’t known and caused many problems in several responsive blogger templates. within Few hours, several bloggers reported that content of the widget starts disappearing whenever they edit the widget and add some content in it.

      Followings are the widgets that affected through this bug

      • Header Image Widget(Logo Widget) not showing the logo just a text.
      • Menu Widget Disappeared when adding new menu item.
      • Featured Widget (Slider/ Recent Post Wiidget) Stopped Working.
      • Author Widget not showing the Author Image or Content.
      • Instagram or any other social Widget stopped working.

      How to Solve Blogger Widget Disappear Problem

      • Dashboard -> Template -> Edit HTML
      • Click the Jump to widget button and select the affected widget, you’ll see somthing like

        blogger jump widget image

      • Once you Select the widget you’ll see something like this :

        Widget code can be different for different widget you only look for Visible property.

      • As you can see Visible is set to false, Just Change false into true and save the template.
      • You only have to Change Visible false in to True nothing else.

      Note : There are many reasons that can cause the widget to stopped working please make sure it will work only If you’re widget was working before and just disappear when you edit the widget.

      Leave the comment if that works for you or not.

      Free Display Font Bravery

      Free Display Font Script – Bravery

      Today we are sharing an elegant looking Free Display Font Script – Bravery. A display typeface is different than regular font scripts as they mostly are used to attract a reader into text, to create a feeling, or use to announce an important information.

      When you see most of the display font script they are expensive and not as beautifully designed as this one. And if you lucky enough and found a font which is perfect for your project/ Graphic Design or as per your need but you may not use it due to licensing restrictions. But This is not the case with the Bravery Font. Means it is available Free for any personal and commercial use.

      Recently we have shared the handwritten font playlist if you’re looking for hand drawn type font script.

      Download Package Included:

      Bravery.otf & Bravery.ttf

      • Filetype: .otf & .ttf
      • Size: 0.1 mb
      • Info: OTF & TTF
      • License: Free for Personal and Commercial Use

      Free Display Font Script – Bravery Demo

      Bravery font demo styles

      [sociallocker]

      [/sociallocker]

      Blogger Undefined Problem Image

      How to Solve Blogger Undefined Problem

      Often When you upload/Install a new custom made blogger templates in your blog. You’ll notice a common problem occurs in your blog ie.Blogger Undefined problem. Basically It’s just Timestamp Error which is not supported by Blogger.

      Why Blogger Undefined Problem occurs

      This Question has been asked many times by newbie bloggers that what is this undefined date problem and why it occurs. they might be thought that the problem is with their blog post setting or with the template. It’s nothing but a simple Timestamp Problem.

      When you use custom made 3rd party template you know that these Blog templates provide features which you won’t find in any default blogger template, and blogger supports the limited type of Date styles and to make a custom date style, we blogger developers achieve this using javascript methods. So what we do is we take a blogger mm/dd/yyyy Timestamp format and change it to any custom date style like January 1, 2016.

      How to solve Blogger Undefined Date Problem

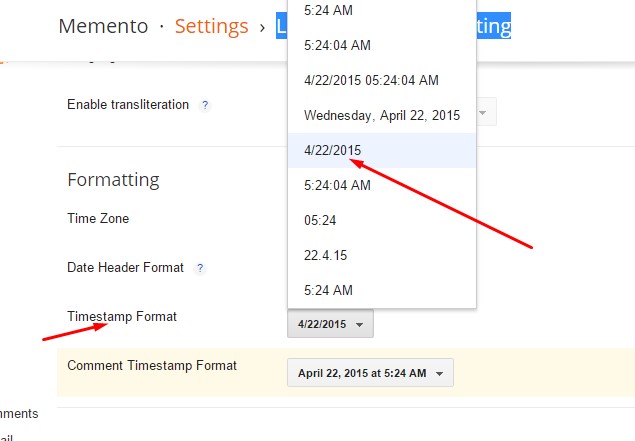
      1. On Blogger Dashboard Click Settings.
      2. Click Language and formatting.
      3. change Time Stamp > only Choose mm/dd/yyyy.
      4. Then Click Save settings.

      Blogger Date setting Image


      I hope this tutorial will help you out & solve this problem If you have any queries and question. please leave a comment below.

      Handwritten Font Script Image

      Free Handwritten Font Script – Playlist

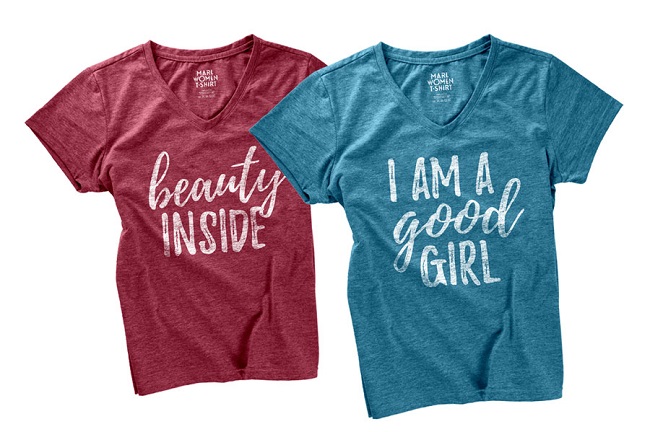
      Today we bring you a stylish Handwritten Font Script named playlist. A perfectly designed hand drawn font style with dry brush effect. Font is available for free for personal and commercial use, the package contains 3 font styles Script, Caps, and Ornament.

      So the combination of all 3 styles can be used in any creative project, graphic design, and logo. Mostly suitable for wedding invitation cards,visiting card, greeting card, quotes, wall poster, t-shirt design, etc.

      If you’re looking for a light weight handwriting font script then you should also take a look at metafors. Arkana font can also be a good choice if you’re more like into vintage fonts with brush effect.

      Free Handwritten Font Script – Playlist Demo

      Playlist free font style 1 with cup image

      Playlist free font style 2 with visting card image

      Playlist free font style 3 Tshirt image

      [sociallocker]

      [/sociallocker]

      increase Instagram followers easy guide image

      How to Increase Instagram Followers The Effective Method

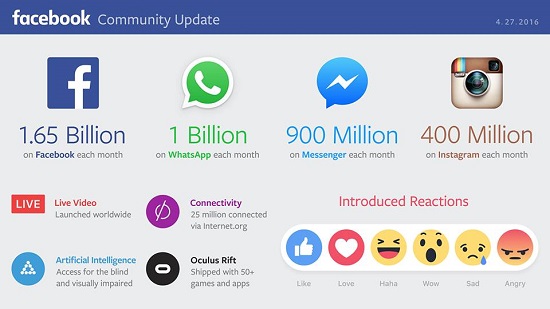
      Everybody Knows about Instagram, A Fun Simple image sharing app and it has quickly become one of the best social visual media platform and fast-growing social media site with over 400M+ Monthly users and on average 80M+ photos shared on a daily basis. Despite that Recent study reveals that it has 25% better engagement than any other social media sites, Even better than twitter. Getting the right real followers and engagement can be tricky if you’re not using the right strategy, Below is some points mentioned that will help you Increase Instagram Followers.

      Instagram-followers-stats

      Increase Instagram Followers & Blog Visitors

      So having a large followers list under your name & build a community will definitely boost your site traffic, increase sales or Build brand name. Instagram has worked well for many marketers and I know some of them how they increased massive followers within a short period of time, by using this simple strategy.

      1: Write Instgram Bio and Add Website Link to it

      The best way to drive traffic to your blog is adding the link to your blog/website to your Bio. The Strategy called “link in Bio” strategy. Don’t just add the link in the bio you need to add some descriptive information about yourself as well.you need to ensure that whoever reading bio completely understand what you do and what is this account all about.

      Jenn Herman, An Instagram consultant points out the best way to create an Instagram bio that attracts followers. Make sure you have all those points in your Bio.

      Instagram-Bio-Example

      2: Use HashTags To Reach Targeted Audience

      Just Like Twitter, Instagram Also uses hashtags to organize the photos provide search options based on that particular hashtags. Using of Hashtag will Improve your Photos visibility and reach the targeted audience. Some hashtags are more popular than others but don’t overuse it can be annoying for the user just use the relevant one that helps you categorize your photos.

      Recently Buffer did Research on this and found that Instagram Post with 11+ Hashtags Gets Higher Engagement

      Hashtags-on-Instagram-reach

      So, How do you find those 11+ relevant hashtags which you integrate into your Instagram post?

      The process is very much alike keyword research, Using the right tool and right method will help you find the relevant hashtags which perfectly describe your post and reach a more targeted audience to increase Instagram followers.

      Webstagram compiled the list of 100 Most Used/Popular hashtags which you should Include in your post.

      And you can also you use the online web tool to find the relative hashtags. Hashtagify.me is a simple Instagram tool which helps you analyze your hashtag and display how other hashtags are correlated to the original one.

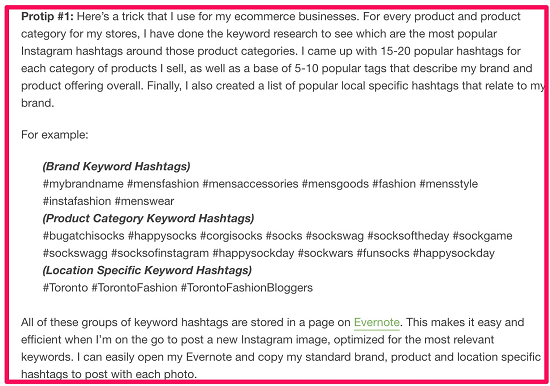
      Recently, while I was researching on topic, I stumbled Upon an article where an e-commerce site owner increases his Instagram followers using a simple but effective Technique.

      Increase-Instagram-followers-technique

      3: Increase Instagram followers By Posting at Right Time.

      Like most of us, you did everything which points are described above but still you’re images aren’t getting that exposure as you thought it would. Most of the users who goes to school or work login in the morning, and in the evening, on their way home or reach home.
      So, what should be the right time for posting images on Instagram? According to the Latergramme, A Service which allows the user to schedule & manage the Instagram post did a research on more than 60,000 Post to determine when’s the images received the maximum engagement.

      And In the research, they found that the best time to post on Instagram at 5 p.m. EST on Wednesdays. But you should add post throughout the day to better engagement with your followers.

      Schedule your post so that you can add the post when you asleep. There are many services out there like later and iconosquare , The best tool to full analysis of your Instagram account and details about your New Followers, Most Popular Photos, Best Time to Post.

      4: Increase Instagram followers By Embedding Instagram Widget In Your Blog/ website.

      Embedding Instagram widget can be very helpful to you build a strong following on this platform. As Instagram doesn’t have their Official widget so you can use the Third party Websites like snap widget, Instawidget, and many other similar sites or you can use some javascript to show your Instagram feed in your blog.

      There are many advantages of using javascript method rather than third party sites like the snap widget is that whenever user clicks on your Instagram widget it will take them to their site rather than open an Instagram app or site if they are visiting from the desktop, Although javascript method will open the image on app directly and then user can like your other images and follow you directly and you can change mould the widget however you want or you can use the theme/template which support this method. Like Our Bush Blogger Template which supports javascript method in the sidebar and in the footer as well.

      Share your thoughts what other Methods or strategies you’ve used to grow your Instagram followers?